|

| |
Minimoog #6128
What's a Minimoog? Technically it's a 3 oscillator monophonic
synthesizer. Sonically it kicks some serious butt.
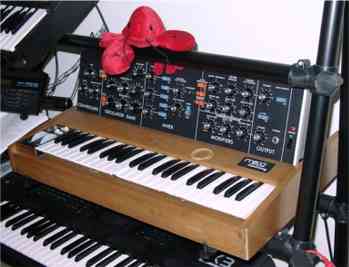
Lulu peers over the Minimoog
Around 1970 Bob Moog borrowed many components and ideas from his large modular
synthesizers and simplified them. What you have is a small Moog modular synth
without patch cables. All the routing is defined for you, and all you have
to do is twiddle knobs or flip some switches. Modulation (affecting one
signal with another) is limited, there's no oscillator sync, and the unit
doesn't even do well with external voltages coming in (due to keyboard voltage
sag, which is fixable from what I understand). But it sounds GREAT, and
it's a joy to "program" (OK, twiddle).
And you want to "save" those neat sounds you just twiddled in? The
Minimoog has unlimited memory capacity because it uses one of the oldest and
most reliable storage mechanisms ever devised: the pencil. :-)
The Minimoog's simplicity may lead you to think that this synth is limited, but you'd be
wrong. Yes, it has a particular overall sound, but within that range you
can create all kinds of wonderful noises, from thunderous crashes to screaming
lead lines to bizarre blips and bleeps.
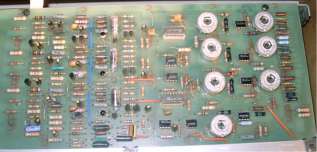
Repairs
In August 2002 ol' #6128 decided to have some problems of its own---beyond
the squirrely keyboard it's always had. Fortunately the schematics are
freely available. You can get some from
Synthfool, and there are others tucked around the 'net (best search engine
is Google---through it I even found a
potential source for the TelLabs Q81 temperature compensating (tempco) resistor).
Anyway, here are the problems that Minimoog #6128 decided to start having and
what I did (or am trying to do) about them.
 | Problem: OSC 1 way too high in pitch, was intermittent then
almost completely failed, went back to intermittent after all the work below.
When it is misbehaving, pin 5 on IC2 (SG3821N) churns out an unstable waveform
several times too high in frequency, along with a voltage that is too high.
You need to turn the range to 32' or lower to hear anything other than white
noise and the filter opening/closing. Quickly short/release pins 5 &
6 on IC2, and OSC 1 may work for a little while, although you'll hear an
unstable pitch every now and then. Eventually it goes back to being
wonky.
Fix: The problem seems to
have gone away on its own right now, but only after replacing several
components on the oscillator board (details below)--not including the big
polystyrene capacitor for OSC 1. So let's keep the fingers crossed, eh?
Attempted:
- Examine voltages and ohms. OSC 1 and OSC 2 are fairly close, being off
by fractions of a volt here and there. I can find no shorted resistors,
transistors, or caps.
- Examined the waveforms coming off IC2:
Pin 5 is crappy, its equivalent in OSC 2 Pin 8 is snazzy. The voltage at
Pin 5 is different when OSC 1 is working vs. when it is not by about 3
volts.
- Swap the 2 SG3821N ICs
- Replaced IC3 (741 op-amp) and put into an IC socket
- Replaced capacitor C2. OSC 1 worked GREAT for about 5 seconds after
initial power up, then went crappy again.
- Replaced capacitor on top of R78 (duh...I think it's just an RF
filter...amateur screw up!)
- Replaced the Molex sockets under IC2 with an IC socket (the Molex socket's
pins are not insulated and can short together)
- Replaced the SG3821N (IC2) with a CA3046 from Mouser (an LM3046 clone, a
stable replacement for the SG3821N IC)
- Replaced IC1 (741 op-amp) and put into an IC socket
- Replaced R19 (1K resistor in the tempco circuit)
- Replaced the TelLabs tempco resistor with a regular 1K resistor temporarily,
didn't help, so I put it back in
After that, other possibilities:
- Replace the Mallory SXM110 .01uF 2.5% 160V polystyrene cap (C1), not easy to
find. The closest I've found is an axial polystyrene cap at 50V, 5%,
which should work. I also ordered some 100V 1% capacitors that are not
polystyrene but are another plastic.
- Replace tempco resistor, not easy to find
And when all else fails:
- Bring it somewhere...:-)
 |
| Problem: OSC 1 square wave gone.
Fix: Q11 (2N4058 transistor) shorted, easy to find with an ohm meter.
I replaced it, and the square waves are back. The square waves sound
a bit more brash than OSC 2 or OSC 3 now, so this may have changed the sound
of the machine. Or that may all be in my mind. |
| Problem (7-Nov-2004): OSC 2 dead. Was fine, all of a
sudden went belly up.
Fix: IC5 (a 741 op-amp) had low
voltage on pin 3. The op-amps for the other two oscillators had higher
voltage. I replaced the op-amp, and OSC 2 came right back. |
I've been attempting to bring the keyboard back to good playing condition.
The Pratt & Read keyboards aren't the best things, and this one is feeling its
oats.
| Problem: "Squirrely" notes--notes that won't hold a tone
constant and chirp like a warbler. I chased this into the keyboard, and
it's mostly on the notes next to the "bridges" that hold the buss bars in
place. It's the spring contact with the CV buss bar (the buss bar over
the resistors)---it does make contact, but the buss bar seems to bend "just
enough" to cause trouble.
Fix: Turning the buss bars took care of this. Not just the CV
buss bar, but the others as well. Eventually I hit upon a combination
that worked just fine. Sure, some of the notes are at tiny bit off---a
slight rise in pitch at release, for example. But no more squirrels!
Attempted:
- Cleaning the buss bars and springs. This generally works for exactly
one keypress.
- Turning the buss bar a little. This made a difference, but it's not
100%. I'm going to try messing about with this some more.
After that, more possibilities:
- Maybe the key stops (where the bushings are) are too high and can be bent
down a millimeter or two. Nawww, couldn't be that easy...
- I may try to fashion my own "bridge" to hold the
buss bar more firmly in place. Yes, OK, a hack.
- Perhaps the existing bridges moved around a bit. Unfortunately
loosening and moving them a smidge requires major surgery (removal of the buss
bar PCB).
And when all else fails:
- That's what the Kenton is for. :-) (Although the keyboard is
pretty nice after the bushings were replaced.) |
| Problem: The Mini's Pratt & Read keyboard (sometimes seen as
Pratt-Reed keyboard) has one key too high in the front, various key clicks,
and sloppy
action.
Fix: Replace the Pratt & Read bushings. These are little
rubber stoppers under the fronts of the keys, and they deteriorate as the synths age. Eventually you'll have uneven keys, your keys will click,
and the action will be uneven.
I have so far found two solutions to this, one from
Virtual
Music in Vienna and one from
Archive Sound. I purchased the Pratt & Read bushings from Rich at
Archive Sound, and I have
installed them. Here's how it went.
|
Archive Sound Pratt & Read Replacement Bushings
The promise of new life in the old Pratt & Read
I purchased brand new keyboard bushings from
Archive Sound. These
replace the old rubber bushings underneath the fronts of the keys.
These bushings cushion the key press and key release, and the Archive
Sound web page promises a completely different feeling keyboard.
So...Do they deliver?
You get a series of these bushings in your package, in my case 45 (44
and one for good luck, I guess). Cost is about $1 per key. The
bushings look pretty close to what was there before, except they're black
and they seem to have longer fins (unless the fins on my old ones were
worn down by age). The material they're made from is very pliable,
and they are sent covered in some kind of lubricant.
Installation was quite simple. Archive Sound has installation
instructions on their site (which you should read), but I thought it'd be
good to get some pictures while I had my Mini's keyboard out and write
first-hand what I did, since you may be thinking about doing this.
IMPORTANT: I AM AN
AMATEUR. I may be doing something wrong that'll wreck your machine.
It's YOUR machine, YOU take the risk if you follow my steps here. If
you know less than I do, you'd better take your machine to a service
person. I'm right on the edge of doing that myself. :-)
Tools required:
| Phillips screwdriver |
| Flat blade screwdriver |
| Some kind of tool to remove the old bushings. Long nose pliers
may work, but I had a long pin with a wooden handle from some kind of
old drafting set (no, I don't know what it was for, but I'm glad I had
it). I imagine a tiny but strong screwdriver may work as well.
Something of strong material with a small hook on the end may work the
best---slide it under the old bushing, hook on the back side, and
pry/pull! |
| Tie wrap |
| Someone to help steady the Mini while it's on its edge |
Steps:
Remove the Minimoog keyboard. I'd never done this before, but it
turns out to be really easy on
a Minimoog. Remember to call your friend over to help you when
needed.
- Turn the Mini over and remove the bottom cover.
- Mark the keyboard connector for easy reassembly--it is not keyed, so
mark it so you put the correct edges back together.
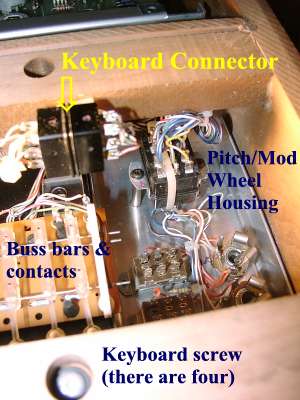
- Snip the tie wrap holding the connector together and unplug the
keyboard connector.
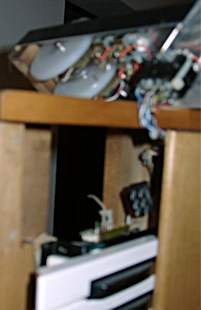
- Put the Mini up on its right hand edge.
- Loosen the screws holding the Pitch/Mod wheels. Remove them as
one unit and set on top of the Mini.
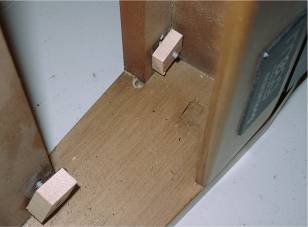
- Loosen the four screws that hold in the keyboard.
- There are wooden blocks on each of the four screws. Don't mix
them up, as they are different sizes for a reason. I labeled them.
- Gently tilt the front of the keyboard out from its usual resting
spot and pull forward, taking care that none of the wires are snagging
anywhere. Be careful not to hit the buss bar and spring contacts
as you remove the keyboard (replacing those contact springs or a bent
buss bar is major surgery).
- The keyboard should come right out.
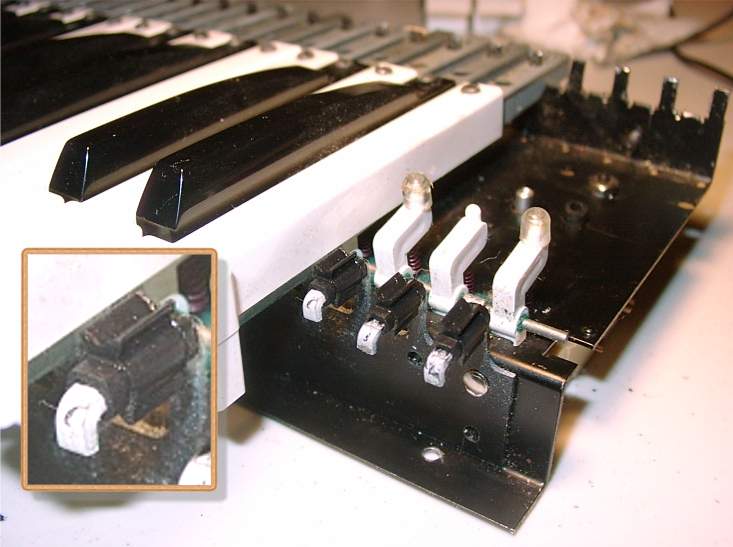
Remove the old bushings. Some of these may be brittle or stuck
onto the keys, so be sure you get all the chunks out. The below
description is the "easy" way.
- Remove each key by unscrewing the slotted screw on the top.
Push the key forward, and it'll come off easily.
- Reach in under the metal part of the key with the tool to remove the
old bushing (very small screwdriver or---in my case---the big pin).
I jammed it underneath the bushing, pried up and pulled forward.
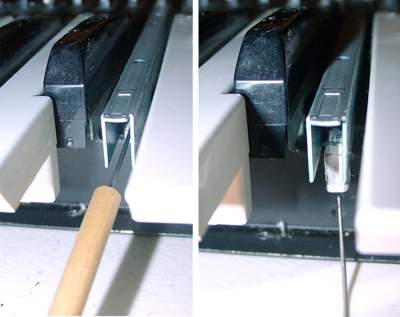
The old bushing should come out (in the picture on the right you can see
the old white/gray bushing getting dragged out), although it may be a
bit of a struggle. You may need to cut it up using some kind of
blade and remove the pieces. Remember to get all the chunkies out!
If you get stuck and cannot get the old bushing out, you can try the
"hard" way (it's not difficult, it just is slightly more involved).
- You don't need to remove the keycap, but if all you're removing is a
black key, you will need to remove any blocking white keys (or their
keycaps).
- Turn the keyboard around.
- Remove the spring on the back of the keyboard of the key you wish to
remove. I used long nosed pliers.
- Tilt the key up from the back until it clears its post, then push it
forward.
- The key slides off the front.
- You will clearly see the bushing. NOTE: You will also
see the "bellcap" that covers the rod that is pushed when you press the
key. Do not lose this. Put it back where it belongs before
you put the key back on.
For more information about the Pratt & Read keyboard, the kind of
contact cleaner to use, the kind of grease to use on the bellcaps, where
to get parts and more, see
Schober Organ
Notes No. 56.
Replace the bushings after you clear out all the old bushing's chunkies.
- There is no front/back for these bushings, so they can go on however
you want them to.
- My suggestion: Each bushing has two sides that are shaped like
a "V". This is top and bottom. Find the "V" that has a
little more material---it'll be a little thicker at the bottom of the
"V" than the other side. Let this "thicker" side be the top.
- Slide the hole over the holder and push as far as you can with your
fingers.
- Using a flat blade screw driver, push against that "thick" part of
the "V" until it won't go anymore, but be careful you don't wreck the
bushing. Then push on the bottom part to get it to go over the
bend in the holder. Push a little more on the "thick" side if you
have to. It should pop on without much fuss.
- If you have taken all the keys off using the "hard" way, you may be
able to push the bushing on using your fingers and no tools.
Screw your keycaps back on (or put your keys back on and reattach the
springs if you used the "hard" way), and you're ready to go.
That's all there is to it.
Now replace the keyboard, very much in the reverse order of removal.
Call your friend over to help again.
- With the Mini up on its side, slide the keyboard back in.
Don't lose any of the little wood pieces on the screws---make sure they
stay put. Get the keyboard as close to its original position as
possible.
- Slide the Pitch/Mod wheel section back in its place. Note that
the back edge fits into a slot in the wood (this holds the back part of
the Pitch/Mod wheel assembly in place---it just slides into the groove).
Tighten the two screws that hold it in place on the front.
- Now tighten the keyboard with its four screws on the very bottom of
the Mini.
- Reconnect the keyboard.
- Test the machine. If not working, fix.
- Replace the tie wrap on the keyboard connector.
- Put the bottom back on.
You're done.
So...Do the new keyboard bushings deliver as promised?
I knew you'd ask. Here's what I noticed straight away:
| The keys are all level |
| The action now has short, positive throws |
| The keys all feel the same---they are all now very consistent up and
down |
| No more annoying click from that key where the bushing was
disintegrated! |
| The keypresses don't feel "dead" as they did before---no "thunk",
there's a bit more zip to it |
After I got rid of the squirrely notes (see above), I put the Mini back
together and played it for a while. OSC 1 did me the favor of
working for a few minutes. Well, the verdict is in. If the
Mini wasn't addictive enough to twiddle and play already, it's now even
more addictive. The keyboard demands to be played. It's not
mushy like keyboards in other synths. It's crisp, it requires just
the right amount of pressure, and it feels solid. I know the Archive
Sound kit made a difference.
Can anything so simple as the Archive Sound replacement bushings make
such a huge difference in the playability of a keyboard? From that
I've seen, yep, renewing those bushings is a really good idea for the
tired ol' Minis out there and other keyboards using the Pratt & Read
mechanism. Look into it! |
Thank yous...
Man, I have too many people to thank for their patience and assistance.
In no particular order:
| Rich over at Arcsound |
| Don B. (DB Musical Electronics) |
| Harry K. (Minimoog YahooGroup) |
| "Synthfool" Kevin L. |
| Norm L. (Mellotronist) |
| Robert L. |
| "Padre" Alan R. |
| Don T. (Mellotronist) |
| ACK Supply, Mouser, and Radio Shack (of course) |
|